Visual Materials
Big Creek Powerhouse #3 - Station Service Bus and Switch Room Power & Light

You might also be interested in

Big Creek Powerhouse #8 - Disconnect Room
Visual Materials
Big Creek Powerhouse #8 - Disconnect Room - station light & power.
photCL SCE 02 - 10116

Pacific Light & Power Corp. - Big Creek early construction photos
Visual Materials
Pacific Light & Power Corp. - Big Creek early construction photos [Gravel pit, sluicing PH#2 site, Powerhouse 1 under construction, Powerhouse 2 under construction, Units 1 & 2 at PH1, PH2 Switchboard, Generator Room, Hoist #2, oil switch room, 6600 V switch room, local service switchboard, generator assembly, Tunnel 2 - adit 1, 2, 3, 4, 5, 6, 7, & 8; Intake to Tunnel 1, 9' flow pipe, west portal Tunnel 1, concreting surge tank at West Portal Tunnel 2.]
photCL SCE 13 - vol 011

Big Creek Powerhouse #3 - Switch Board Reg
Visual Materials
Big Creek Powerhouse #3 - Switch Board Reg. - PH #3
photCL SCE 02 - 12103

Big Creek Powerhouse #3
Visual Materials
Big Creek Powerhouse #3 - Sand Trap B.C. 3 Tunnel.
photCL SCE 02 - 30514
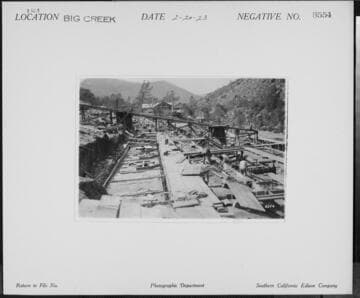
Big Creek Powerhouse #3
Visual Materials
Big Creek Powerhouse #3 - Powerhouse #3 Switching Station site showing excavation work and concrete foundations for circuit breakers and bus structure. [Hospital and Dormitory in background.]
photCL SCE 02 - 08554
Image not available
Pacific Light & Power Corp. - Big Creek early construction photos
Visual Materials
Early construction photographs of Big Creek. Includes views of gravel pit, sluicing Powerhouse No. 2 site; Powerhouse 1 under construction; Powerhouse 2 under construction; Units 1 and 2 at Powerhouse 1; Powerhouse 2 switchboard, generator, Hoist No. 2, oil switch room, 6600 V switch room, local service switchboard, generator assembly; Tunnel 2 - adit 1, 2, 3, 4, 5, 6, 7, and 8; Intake to Tunnel 1, 9' flow pipe, west portal Tunnel 1, concreting surge tank at West Portal Tunnel 2. Photographs by Stone & Webster Engineering Corporation.
photCL SCE