Visual Materials
Big Creek, Mono-Bear Diversion

You might also be interested in
Big Creek, Mono-Bear Diversion
Visual Materials
Big Creek, Mono-Bear Diversion - Close-up view of Mono Creek Dam and intake structure, looking at same from the side of the rack bars which are submerged.
photCL SCE 02 - 14768

Big Creek, Mono-Bear Diversion
Visual Materials
Big Creek, Mono-Bear Diversion - Close-up view of Mono Creek Dam and intake structure, looking across the downstream face.
photCL SCE 02 - 14769

Big Creek, Mono-Bear Diversion
Visual Materials
Big Creek, Mono-Bear Diversion - Another view of Bear Creek Dam and reservoir, showing sluice pipes, gate mechanism, walkway, gauging house and top of intake structure.
photCL SCE 02 - 14755

Big Creek, Mono-Bear Diversion - Mono-Bear Siphon
Visual Materials
Big Creek, Mono-Bear Diversion - Mono-Bear Siphon - Mono Flow Line - Looking downstream from intake.
photCL SCE 02 - 23391

Big Creek, Mono-Bear Diversion
Visual Materials
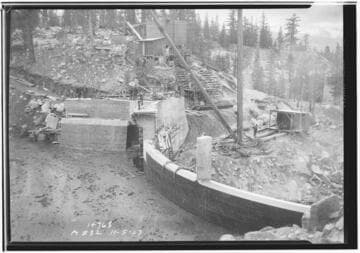
Big Creek, Mono-Bear Diversion - Looking downstream at Mono Creek Dam and intake. The reflection in the water gives the middle of the pond the appearance of being something like a tunnel dump.
photCL SCE 02 - 14767
Image not available
Big Creek: Mono-Bear and Huntington-Shaver Diversions
Visual Materials
Views of Bear Dam, Mono Dam, Mono-Bear pipelines and diversions, and Huntington -Shaver diversions. Construction of Bear Creek Dam and intake structure, and Mono Creek Dam and intake structure, logging area for Mono Creek reservoir, pipeline crossing south fork of San Joaquin River, Camps 71, 72, 73, 80, 81, 82, 83, and 85; Mono-Bear siphon, backfilled siphon and pipeline, tunnels, pipeline installations, outlets of Mono and Bear Tunnels, intake of Bear Tunnel at Camp 86, Intake of Mono tunnel, Big Creek siphon, duplex valve on Huntington-Pitman-Shaver conduit and tunnel, intake for conduit at Dam 2, Warehouse, Mess hall and Hospital at Camp 73.
photCL SCE